每次Riverpod的新版本发布,都会带来更多改进,以及其周边生态系统的不断完善:
- 核心包为我们提供了强大的响应式缓存和数据绑定的API
- Riverpod Generator包简化了学习曲线,带来了显著的可用性改进(我已经在这篇文章中进行了介绍)
- Riverpod Snippets扩展帮助我们轻松创建提供程序和消费者
而新的Riverpod Lint包添加了许多有用的Lint规则和重构选项,使得编写Flutter应用程序变得轻松。
但还不止于此。
使用Riverpod进行现代开发非常愉快,因为您可以用很少的代码编写复杂功能,比如搜索和分页(并让工具来指导您)。
在这篇文章中,我将向您展示如何将我的时间跟踪应用重新构建为使用最新的@riverpod语法,包括代码生成、代码片段、重构选项和新的Riverpod Lints。
这篇文章将展示当Riverpod Generator,Riverpod Lint和Riverpod Snippets扩展一起使用时,它们是一个强大的组合,但并非完整的资源。请查看每个包的文档以获取所有用例。
添加所有必需的包
由于我们将使用Riverpod Generator和Riverpod Lint,因此需要将一些包添加到我们的pubspec.yaml文件中:
dependencies:
  # the main riverpod package for Flutter apps
  flutter_riverpod:
  # the annotation package containing @riverpod
  riverpod_annotation:
dev_dependencies:
  # a tool for running code generators
  build_runner:
  # the code generator
  riverpod_generator:
  # riverpod_lint makes it easier to work with Riverpod
  riverpod_lint:
  # import custom_lint too as riverpod_lint depends on it
  custom_lint:
我们还需要在 analysis_options.yaml 文件中启用 custom_lint 插件:
analyzer:
  plugins:
    - custom_lint
接下来,我们需要以观察模式启动build_runner:
flutter pub run build_runner watch -d
-d标志是可选的,等同于--delete-conflicting-outputs。正如其名称所示,它确保我们覆盖了以前构建中的任何冲突输出(这通常是我们想要的)。
这将监视项目中的所有Dart文件,并在我们进行更改时自动更新生成的代码。
既然设置已经完成,让我们看一些代码。
使用Riverpod Generator和Riverpod Lint进行重构示例
假设我们有一个AuthRepository类,我们将其用作FirebaseAuth类的包装器:
// firebase_auth_repository.dart
import 'package:firebase_auth/firebase_auth.dart';
import 'package:flutter_riverpod/flutter_riverpod.dart';
class AuthRepository {
  AuthRepository(this._auth);
  final FirebaseAuth _auth;
  Stream<User?> authStateChanges() => _auth.authStateChanges();
}
假设我们还有这些Provider:
// Make the [FirebaseAuth] instance accessible as a provider
final firebaseAuthProvider = Provider<FirebaseAuth>((ref) {
  return FirebaseAuth.instance;
});
// Make the [AuthRepository] instance accessible as a provider
final authRepositoryProvider = Provider<AuthRepository>((ref) {
  return AuthRepository(ref.watch(firebaseAuthProvider));
});
// A [StreamProvider] for the [authStateChanges] stream
final authStateChangesProvider = StreamProvider.autoDispose<User?>((ref) {
  return ref.watch(authRepositoryProvider).authStateChanges();
});
我们如何将上述提供的新Riverpod Generator语法转换为口语化、专业化的中文呢?
添加一个part文件
正如我们在我的关于Riverpod Generator的文章中所看到的,第一步是添加一个part文件。
通过使用Flutter Riverpod Snippets扩展,我们只需要输入几个字符:  我们可以使用Riverpod Snippets扩展声明部分文件,而该扩展会自动完成正确的文件名:
part 'firebase_auth_repository.g.dart';
转换一个简单的Provider
接下来,让我们看看如何转换这个Provider:
final firebaseAuthProvider = Provider<FirebaseAuth>((ref) {
  return FirebaseAuth.instance;
});
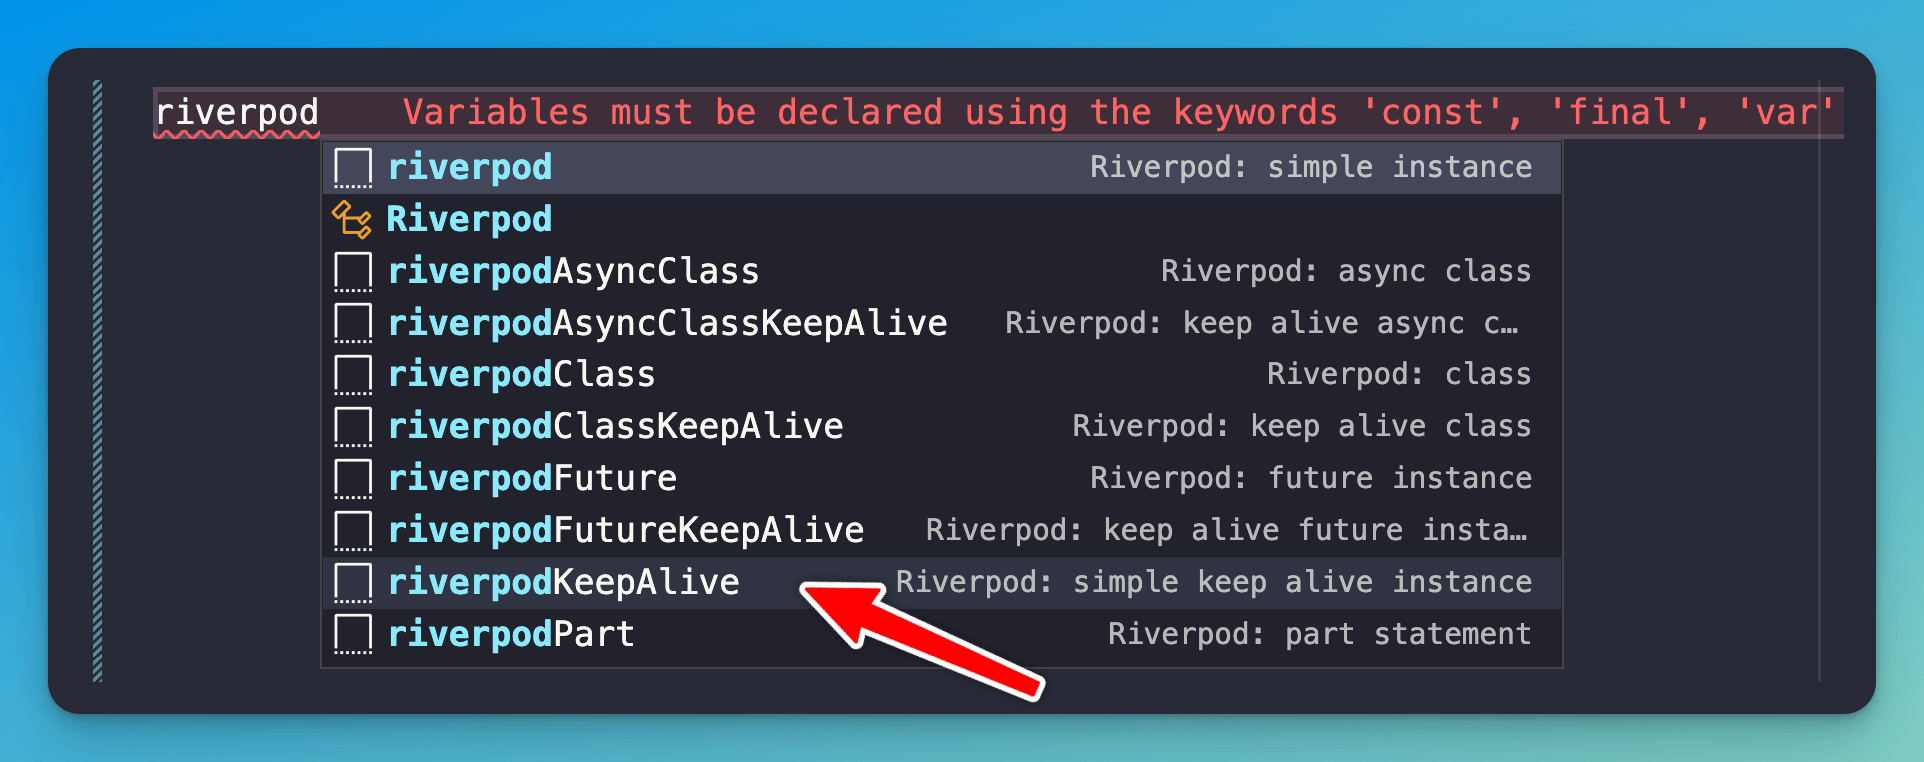
再次,我们可以开始通过键入riverpod来获取一系列选项:  创建Provider时可用的选项列表。在决定选择哪个选项时,我们可以考虑:
- 此Provider是否返回一个对象、一个
Future、一个Stream还是一个Notifier? - 当不再被监听时,它是否应该自行释放,还是应该保持存活?
由于FirebaseAuth是一个在整个应用程序生命周期内保持存活的单例,我们可以选择riverpodKeepAlive选项,并得到以下结果:  RiverpodKeepAlive片段的输出 接下来的步骤是填写以下内容:
- 返回类型
- 函数名称
- 任何额外的参数(在这种情况下没有)
- 提供程序的主体
最终的结果如下:
@Riverpod(keepAlive: true)
FirebaseAuth firebaseAuth(Ref ref) { // Stateless providers must receive a ref matching the provider name as their first positional parameter.dart(stateless_ref)
  return FirebaseAuth.instance;
}
这段代码几乎正确。但是Riverpod Lint提醒我们,必须使用正确的类型,因为生成器为每个提供程序创建了特定的Ref类型。
事实上,函数名称(firebaseAuth)和生成的Ref类型以及提供程序名称之间存在严格的关联:
firebaseAuth()→FirebaseAuthRef和firebaseAuthProvider
所以让我们再次使用"Quick Fix":  使用"快速修复"选项来选择正确的引用类型,然后,呼啦!语法检查器的警告就不见了:
@Riverpod(keepAlive: true)
FirebaseAuth firebaseAuth(FirebaseAuthRef ref) {
  return FirebaseAuth.instance;
}
只要build_runner仍在监视模式下运行,firebaseAuthProvider就会被生成(位于part文件中),并准备好在我们的代码中使用。
重构剩余的提供程序
接下来,我们也需要重构剩下的两个提供程序:
// Make the [AuthRepository] instance accessible as a provider
final authRepositoryProvider = Provider<AuthRepository>((ref) {
  return AuthRepository(ref.watch(firebaseAuthProvider));
});
// A [StreamProvider] for the [authStateChanges] stream
final authStateChangesProvider = StreamProvider<User?>((ref) {
  return ref.watch(authRepositoryProvider).authStateChanges();
});
借助Riverpod Snippets和Riverpod Lint的帮助,这变得非常容易:
@Riverpod(keepAlive: true)
AuthRepository authRepository(AuthRepositoryRef ref) {
  return AuthRepository(ref.watch(firebaseAuthProvider));
}
@riverpod
Stream<User?> authStateChanges(AuthStateChangesRef ref) {
  return ref.watch(authRepositoryProvider).authStateChanges();
}
请注意,我选择在 firebaseAuthProvider 和 authRepositoryProvider 上使用 keepAlive,但没有在 authStateChangesProvider 上使用。这是有道理的,因为前两个提供程序包含长期存在的依赖关系,而第三个可能不需要始终监听。
示例: 生成异步通知器
除了为对象、futures 和 streams 创建提供程序之外,我们还希望生成类似 Notifier 和 AsyncNotifier 的类的提供程序。
例如,这是我在项目中使用的 AsyncNotifier 子类:
class EditJobScreenController extends AutoDisposeAsyncNotifier<void> {
  @override
  FutureOr<void> build() {
    // omitted
  }
  // some methods
}
我本可以手动转换这部分内容。
不过,Riverpod Snippets 再次以方便的 riverpodAsyncClass 和 riverpodClass 选项帮助了我们:  通过选择上面的选项,我们得到以下代码片段:
dart
class RiverpodClassType {
  // Add your class properties and methods here
}
 在使用
在使用 riverpodAsyncClass 选项后,接下来,我们只需填写相应的空白处:
@riverpod
class EditJobScreenController extends _$EditJobScreenController {
  @override
  FutureOr<void> build() {
    // omitted
  }
}
Riverpod Lint还能做什么?
上面的示例展示了如何将现有的Provider或通知器转换为新的语法。
但你可以通过Riverpod Lint做更多事情,包括:
- 从
StatelessWidget转换为ConsumerWidget或ConsumerStatefulWidget - 在函数式和类变体之间转换
再次提醒,查看官方文档获取完整的选项列表。
结论
在Riverpod的早期,选择正确的Provider并确保语法正确(特别是处理带有参数的复杂Provider时)是一项困难的任务。
但正如我们所见,Riverpod Generator和Riverpod Lint使我们的生活变得更加轻松。
现在,将任何Provider转换为新的@riverpod语法只是一个简单的过程:
- 使用Riverpod Snippets扩展添加
part指令 - 选择正确的Provider(再次使用Riverpod Snippets)
- 填写空白部分(返回类型、函数名称和参数)
- 选择正确的
Ref类型(Riverpod Lint使这更加容易)
完成这些步骤后,我们可以保存文件,然后build_runner会处理其余的工作。
在使用它并观察它在过去两年里的发展之后,我认为Riverpod正在以正确的方式解决所有正确的问题。
我毫不怀疑它将会有一个光明的未来。
愉快编码!